bits and pieces
Raspberry Pi Learnings
Getting started:
Skip the story telling and get to the install
A week or two ago, I went to this meetup called Hack the People. It was pretty groovy, and they were talking about setting up a spin-off meetup around Raspberry Pis. I said I was interested, and went about life.
Yesterday morning on the way in to work, I check my email and see that lo and behold this spin-off group DID get organized! Not only did it get organized, but it was organized for this morning (Saturday) at 9am.
"Well that escalated quickly," I thought to myself. I waffled for a bit, and determined that since I hadn't gone and gotten myself a Pi and since I would have to wake up so early to drive in to town, that it just wasn't meant to be.
Shortly after I sat down, a coworker showed up and handed me a small white box and said "Hey, I knew you were interested in Raspberry Pi, and someone gave me this one and you can have it," (she said it way more intelligibly, but I hadn't finished my coffee yet, so my memory is not verbatim) "You'll need to find a power cord, though. I bet IT has one". I went to IT and BAM! I got a multi-charger connector thing and a wall-socket-to-USB thing.
With Google and the planets aligning like that, I decided I should go, so I RSVP'd, researched Pis, and then began digging around the house, looking for accessories. We found an 8GB SD card from a camera (magically unused), and a short network cable we weren't using anymore.
Based on the infor from this incredibly helpful video (http://www.raspberrypi.org/help/noobs-setup/) I went to http://www.raspberrypi.org/downloads/ to download NOOBS and https://www.sdcard.org/downloads/formatter_4 to download SD Formatter.
I ran SD Formatter on the SD card to wipe it, then selected all the files from the NOOBS zip folder and copied them over to the SD card.
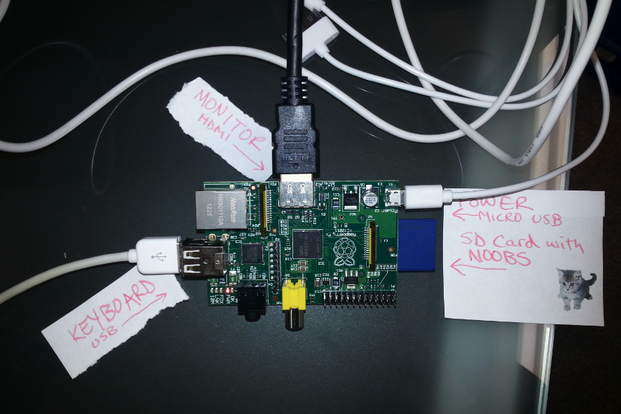
I stuck the SD card in the slot on the bottom of the Raspberry Pi and plugged it in to the mini USB charger. LIGHTS! It was awesome! (I swear the Pi light was on in this photo, but the flash washed it out. The network cable was plugged in for giggles)

I didn't (think) I had a monitor or keyboard I could use, so I pack it all in a GI Joe lunchbox I have been looking to find a good use for and I tossed in a chocolate bar so I could get other people to eat it and not have it sitting on my counter anymore (I don't really like chocolate).
Fast forward to the morning- I wake up, feed chickens, make coffee, water plants, feed cat, and drive in to the meetup, which is at the Portland Code School (http://www.portlandcodeschool.com/), which looks super awesome, and everyone I met there seemed really nice.
OK, so on to instructions:
AQUIRE:
- magically receive a pi!
- get a keyboard with usb connector
- get a monitor with hdmi port
- get hdmi cable
- find 8gb sd card and put NOOBS on it
- get 5V power cord with micro sd card
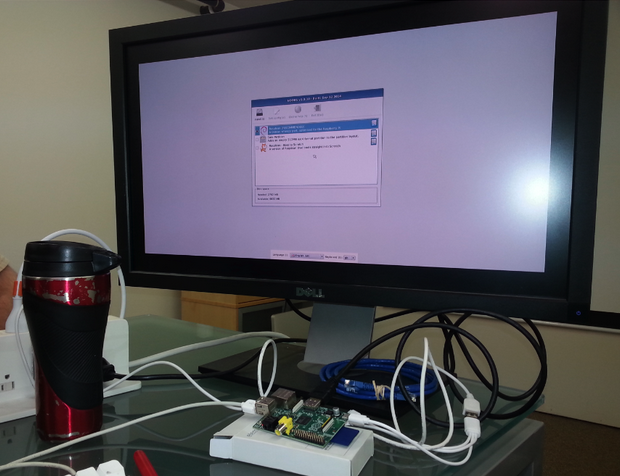
Plug everything in, saving the power cord for last, and it should boot up shortly. You will see a screen with a few install options- if you don't have a mouse handy, use the arrows to move to the Raspbian option, use the space bar to select it, and then hit "i" for "install".
It's going to cycle through some notifications, like the default user is "pi" and the default password is "raspberry" and to launch the GUI on startup you'd type "startx". If you haven't gotten coffee by now, this is an excellent time to get coffee, cause it took around 20 minutes.
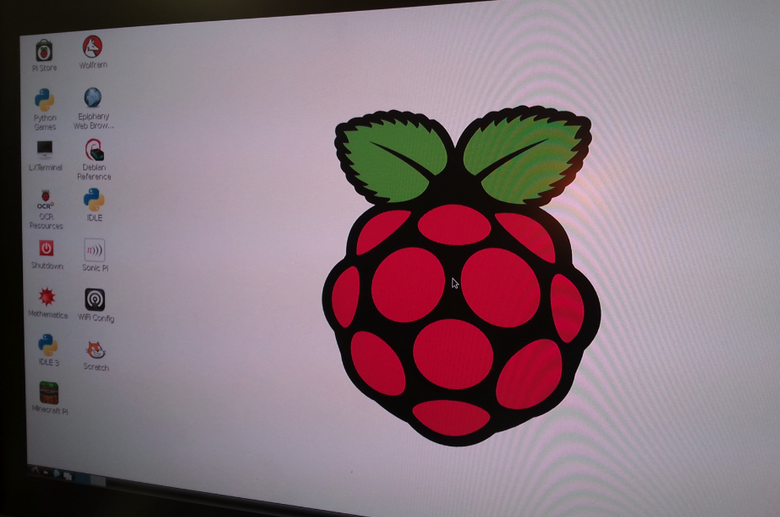
Once It's installed you will get this sweet configuration screen:
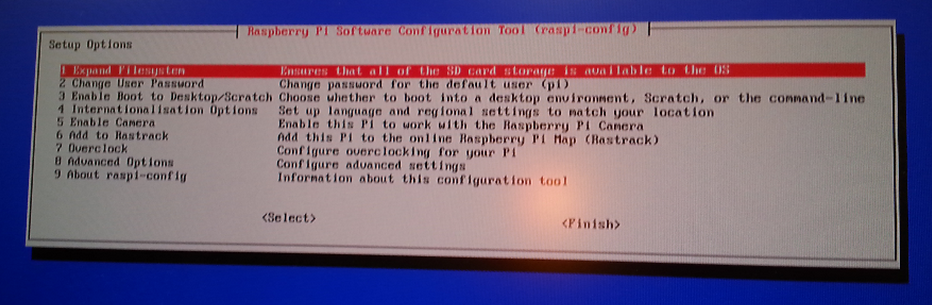
There are a few things you should probably do:
- use the arrow keys to go down to 2 Change User Password and change your password
- go to 3 Enable Boot to Desktop/Scratch and choose whether you would like your Raspberry Pi to look like a GUI home computer (Desktop), or a bare-bones Linux server (command-line)
- 4 International Options will let you choose your tome-zone/language/something else I didn't mess with (en_US.UTF-8 is what I chose)
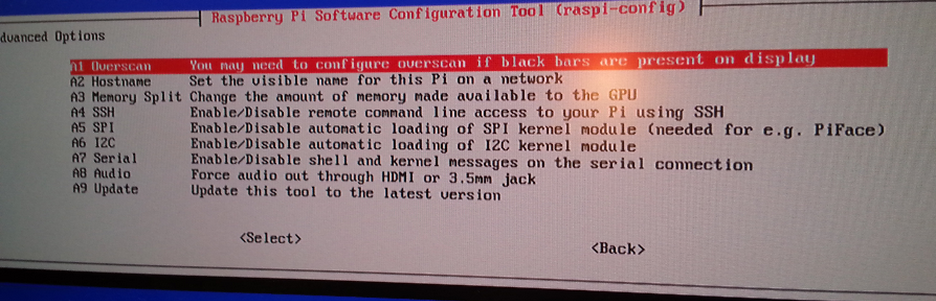
- In 8 Advanced Options, you are going to have a sub-menu that looks like this:
- Change your hostname if you want
- Definitely enable SSH
- use the right arrow to go back, and then to select Finish from the main config screen.
- It'll make sure you want to reboot now (you do), and will do the command line installation dance for you again.

Hooray, you made it!!
OK, so what if you cannot take Code School's monitor and keyboard with you? We decided that we would create an SSH connection between the Pi and my laptop.
Step 1: add the network cable to both machines.
Step 2: set a static IP for the Pi and the laptop.
ON LAPTOP:
On my Mac, I opened up System Preferences>Network and selected Ethernet from the left menu.
I needed to change Configure IPv4 to "Manually" so that my computer wouldn't try to automatically reset my IP address later (You should totes change this back to DCHP when you are done playing with your Pi!)
We set my IP address to 192.168.1.2 and my subnet mask to 255.255.255.0
We wrote this down so we could reference it when setting up the Pi.
ON PI:
On the Pi, I opened up LXTerminal and typed `sudo /bin/bash` to work as the root user
`ifconfig -a` --> for InterFace Configuration -all. This lists all current possibilities for connecting to other things from your Pi. Since we were connecting via network/ethernet cable, we were interested in the eth0 option, so we typed...
`ifconfig eth0` --> to inspect eth0. We want it to match the first three sections of the laptop's IP address & use the same netmask so next we type
`ifconfig eth0 192.168.1.3 netmask 255.255.255.0` --> This sets ip & netmask. We then run
`ifconfig eth0` --> to reinspect eth0 and verify those changes were applied.
`ping -c1 192.168.1.2` --> Will send a little packet of "Hi! Is anybody home?" to the laptop's IP address to make sure a package was sent and received. If it says that 1 packet was sent and received, then we are good to go!
BACK TO LAPTOP!
Open up Terminal and SSH into your Pi by typing
`ssh pi@192.168.1.3` --> I had to open up a new terminal session on the Pi and type `whoami` to find out the user name, since I didn't pay the closest attention during the install…)
It will ask for your password and if you are sure you want to connect (you do).
HOORAY!
You should now be SSH'd in to your Pi!
Congrats!
Remember: when done with Pi play, go back and unset manual to DHCP
This is much shorter than real life because we had to do quite a bit of troubleshooting. Given how the world has interacted with me lately, I think it might be nice to talk about how we troubleshoot things.
First of all, we were super lucky to have several other people with extra equipment there. Being able to swap pieces out makes things pretty much infinity times easier (but still no walk in the park).
Summary of steps:
- turn it off & on again
- un-plug and replug (turn off & on) each component individually, starting with the most likely suspect.
- individually inspect that each component functions with another machine.
WARNING: THIS IS SUPER LONG AND NOT FUN
When I first booted up to the monitor and after selecting Rasbian for an OS, the Pi shut down and didn't really wake back up.
We tried unplugging it and replugging it in. (nope)
We tried unplugging it, pulling the SD card, re-inserting the SD card, and replugging it in. (nope)
We checked that the SD card still had all the files on it (it did). We ran SD Formatter to wipe the card, reloaded the NOOBS files on it, put it back in the Pi, and plugged it in. (nope)
We swapped out my Pi for someone else's and used my SD card-- VICTORY!!! Despite it sounding like the Raspberry Pi was broken and this was the end of the world, this was a good sign, because the harddrive or "brain" of the Pi is the OS on the SD card-- much like Futurama, I could put my SD card in someone else's Pi and all my work would be there. So if the Pi I had was faulty, but I got a working one (they're about $40), I would still have all the settings I had worked on.
While Raspbian was installing, I figured I would see if someone else's SD card worked on my (assumed faulty) Raspberry Pi. As long as the power and my SD card stayed with the loaner Pi, I should be able to unplug the monitor and keyboard to inspect my Pi.
I borrowed someone else's power cord, put their already formatted SD card into my Pi and booted up-- low and behold, it was working like a charm! My Pi wasn't broken! Just confused (or something).
Relieved, I plugged the keyboard and monitor back in to the borrowed Pi with my SD card-- and it promptly crashed.
Great.
That should not have happened.
I rebooted, reinstalled, configured, everything went fine after that until I borrowed someone's wi-fi dongle.
It crashes, but reboots OK.
At this point someone mentions it might be the USB extender I have between the socket and the connector, and I acknowledge that I got it from a bargain bin and it's probably crap.
Everything proceeds as normal the rest of the meetup.
-fast forward to back at home-
I've now bought a new SD card, some adaptors so I can use an old monitor, and found the wireless USB connector for an old keyboard!
I plug everything in--
and nothing.
From all the previous troubleshooting, I've come to realize that a green light will be mostly on if the Pi is working, will flash regularly if something is wonky (who knows what though), and will go dark if there is only power but no intelligence there. There is no green light.
I unplug, remove the suspect USB extender, and re-plug. (nope)
I unplug and replug the SD card. (nope)
I double check the SD card still has everything in my laptop (yup)
I get a wild hunch and check the internet for power supply specifications.
Rasperry Pis want a 5V, connector with at least 1000mA of current. I checked the socket plug.
The darn thing was only good for 1V. :/
I switched it out with my phone charger and tried again-
This time, I definitely had green on my Pi, but nothing was happening on the monitor, and eventually the green died down to the merest flicker (a sign that it's alive but idle, I now suspect).
I add NOOBS to the new SD card and try that. (nope)
I poked around on the monitor for buttons, but couldn't find any.
I flipped the monitor around to see if there were buttons on the back; there weren't, but there WAS a power cord that was unplugged :/
I fixed the power cord, but the monitor didn't come on.
I unplugged and replugged the power. still nothing.
I brought in yet ANOTHER laptop, one that had an HDMI port and plugged it in to the monitor.
The laptop screen flickered the way it always does when I connect an external monitor, but nothing else happened.
I unplugged & replugged the adapter from the monitor. (nope)
I stole the HDMI cable from the Playstation and switched it for the one I was using--
VICTORY!