LM386 speaker for my eurorack synth
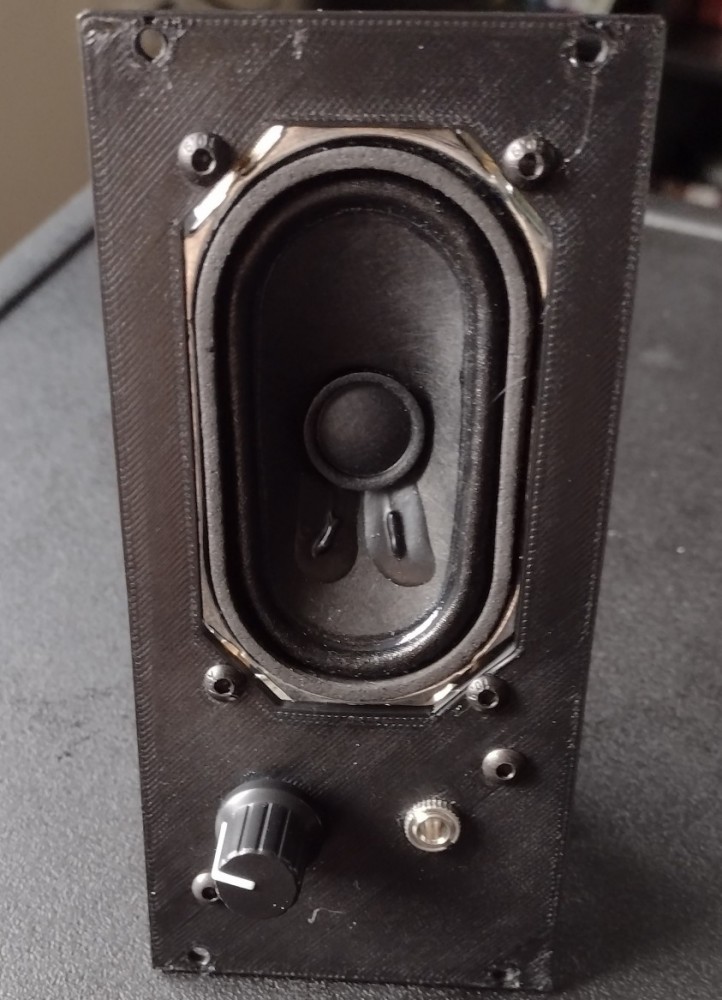
Written by CerenaWe're starting out by covering one of our first modules. This speaker was probably the fourth module we made for the synth, assembled on perfboard and attached to a 3D printed panel. Despite some issues I ran into while designing it, I think it came out alright:

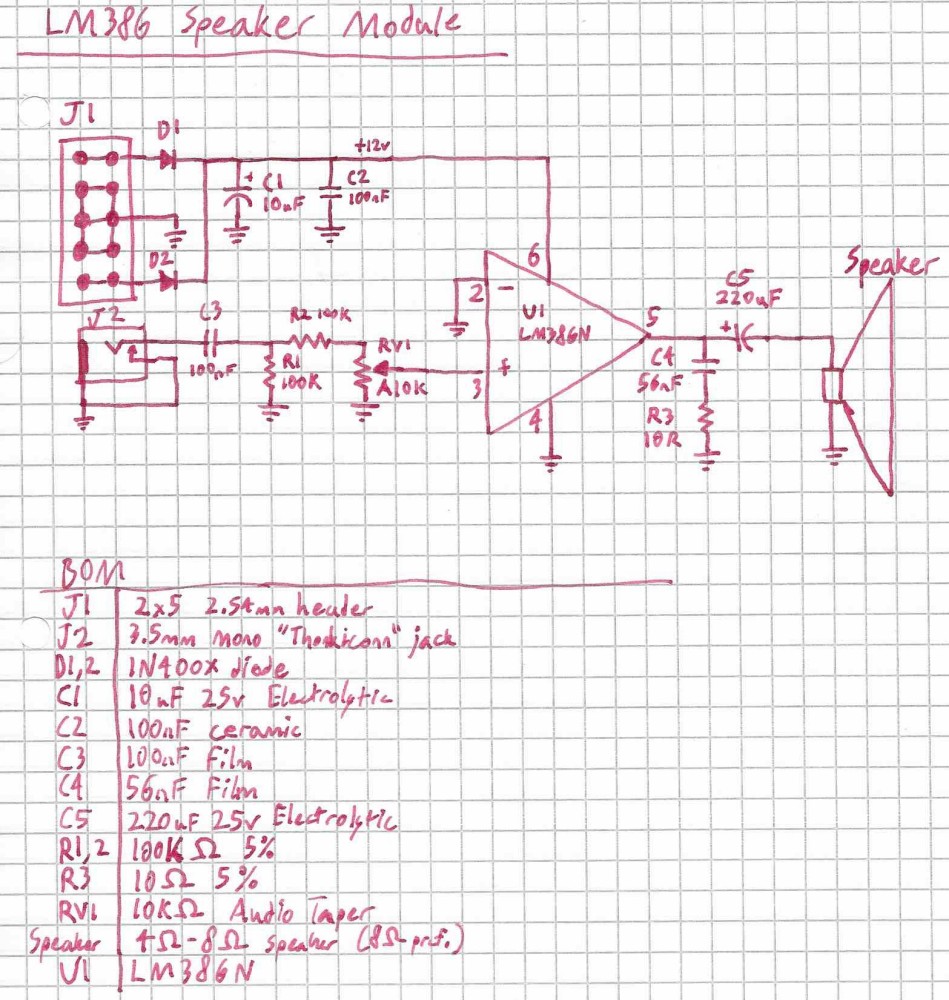
Initially, I had planned to make something based off the Little Gem MKII by runoffgroove.com but when I assembled it on a breadboard, I couldn't get it to output any sound, despite following the schematic. To eliminate variables, I had powered it from my bench power supply and I was sourcing audio from my MP3 player's headphone jack, both things I knew worked fine. I traced the audio path with a pocket oscilloscope, and it seemed to be working alright up until it hit the amps. I just couldn't get sound out the other end, only a small DC offset. The LM386 chips I have on hand may be counterfeits since they probably came from Aliexpress, but I've had them too long to remember for sure. Either way, I had to come up with something different, and I cracked open the datasheet for the LM386. The example circuit given by the datasheet worked, and the speaker made noise! I played around with Texas Instruments' bass boost example, but ultimately, it took off too much headroom. The chip ran way hotter than it needed to, and it just wasn't loud enough to be heard well in a quiet, medium sized room. This wasn't intended to be a hi-fi studio monitor, so some bass rolloff would be fine. A splash of power filtering and a bidirectional power connector later, here is what I ended up with:

To explain - the audio path including and after the volume pot is entirely copied from the LM386 example circuit in the Texas Instruments datasheet. I don't think I can get much better than that. Before the volume pot though, I needed some basic protections. Eurorack audio signals run at a different voltage range than the LM386 expects. If I feed the raw signal directly in (by turning the volume pot all the way up) then it's going to overload the input stage, and it definitely won't have room for any gain whatsoever. I inserted a voltage divider to prevent the module from clipping hard all the time, and to prevent it from drawing too much current from the output stage of whatever it's plugged into. Additionally, there is a coupling capacitor to make sure it doesn't pass DC into the speaker. It would be pretty tragic to go to all this trouble just to burn up my speaker.
On top of all that, we have some basic power handling, in the form of a couple diodes on both sides of the power connector, and a couple of decoupling capacitors on the +12v rail. The diodes make it so that whichever way the power supply is connected, only the +12v rail will ever be connected, and it'll be like the -12v rail doesn't exist. Since I was planning to assemble this on a tiny slice of perfboard, it would be really inconvenient to have a huge shroud around the power connector. It would block the holes for the mounting screws, and it would mean I have to put even more pressure on the module when connecting/disconnecting power. That's just not a great idea on flimsy perfboard with two screws. A bidirectional power connector means I have less headroom to work with, but that doesn't actually matter. The supply voltage of most LM386 chips cannot exceed 14V, and the heat dissipation would become an issue before reaching the limit of the voltage swing. It just all made sense together!
The speaker isn't listed on the BOM because I wasn't sure what I was going to use at the time. I was testing with a bookshelf speaker, and with a speaker ripped out of a weird talking greeting card. After some searching (since speakers are kind of expensive) I decided to order a few from Tayda Electronics while I was ordering parts for another module. I settled on A-3584, and it fit very neatly on a 12HP panel. I did end up having to change the layout of the panel a bit, as it has ears that are set very far back from the front side of the speaker. The product photos don't really show it well, but I'll link some more photos of the back down below, so you can see what I mean. I ended up attaching it with M3 standoffs and lock nuts, so it would sit relatively flush with the panel, and wouldn't be in the way when I reach for controls on the synth.
I couldn't leave well enough alone though, so I did add the TI bass boost circuit, but put a jumper on the board so that it could be toggled on and off. It's really a pleasant effect on a speaker this size, it's just paired with a wimpy little amplifier. If I need to demo it to more people than just me, I take it off so I can have a little more volume. I also added a stick-on heatsink to the IC to help mitigate the heat. I didn't add these modifications to the schematic, but you can see them in the images linked at the bottom of this post.
In retrospect, I probably could have increased the input impedance further, but it won't matter unless I plug it directly into a VCO or similar. I'd love to redesign this with a more efficient chip, but this was explicitly done with things I had on hand. (and one speaker that I ordered from Tayda, eventually) I also should have chosen a speaker that actually has flat mounting ears. If I had ordered Tayda part number A-4341 it probably would have been easier to mount to the panel, and I could have made a speaker grille part of the panel itself. As is, the foam spacer built into the speaker doesn't touch the panel. I'm not sure what effect that has on the sound, but it's probably alright.
Additional photos:
Electronics on perfboard, pre assembly
Assembled module, rear view alternate angle
Project files: