30 days on a Raspberry Pi

I am certainly no stranger to using a Raspberry Pi as a desktop. Ever since I got my hands on a Pi 4, I embarked on a crusade about how can I use it to produce my very own fully-fledged miniature Desktop PC, complete with a graphical desktop environment and all the productivity that a Free Software OS can offer. Initially, I was hooked in a way similar to when I very started using Linux more than 12 years ago at the time of writing.
A short while later, however, this excitement simply died out. My Pi was reduced to a NAS of sorts, a way to passively sit in the network and every now and then serve as a back up medium, or an intra network file transfer facilitator. Of course there were times to learn new stuff about maintaining a networked server (most of my usage of Linux until then was desktop-focused) and I learned a lot of things about deploying services on my own network. But a few weeks later, I set the Pi inside the cabinet next to my router and then... sort of forgot it even existed in my computing routine.
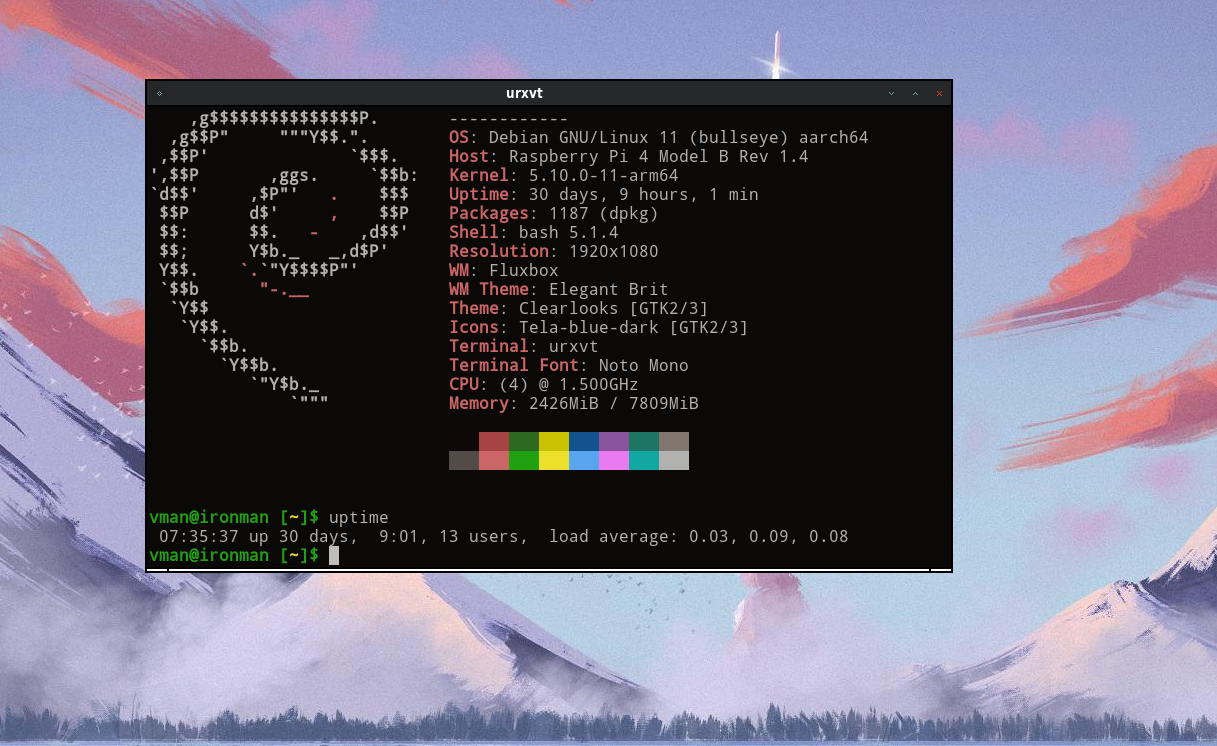
Earlier last month, however, I decided to give again the Pi a spin. Just to blow the dust from the top and see how it was doing, nothing really serious. Fast forward to now, and I have just completed a streak of over 4 weeks of using nothing but my Raspberry Pi as my personal computer. That is: 4 weeks of using it for everything including full browsing, messaging, and even work-related stuff - and I have absolutely no intentions to stop using it!
This has been a radical change even for me and I was left to wonder: how did this happen so radically and fast? Thinking back, I came up with three major reasons that kickstarted it:
- Settling on a definitive passive cooling solution that maintains the working temperature decently.
- Adjusting the color temperature of my monitor to something warmer.
And the biggest:
- Throttling the Raspberry Pi's CPUs back to 100% capacity of 1.5GHz.
In hindsight, this last one was pretty much the sidestepper; the single detail that accellerated the pi so it could feel fast enough again, close to my laptop. See, I'll admit that It took me a while to realize that the Raspberry Pi does not run at 100% of its capacity all the time - i.e. it throttles down the CPU. Back in the days when I tried my hand at its Puppy Linux flavor I really thought the Pi felt slow because of its hardware limitations instead of the throttling.
Before I get ahead of myself and spill the beans on how to take control back of the CPU, let's see each one of these factors in detail:
Arrange a definitive passive cooling solution
People working with older Pi models, perhaps the ones before model 3, probably did not have to worry about the issue of cooling at all. Not only these were not usually chosen for desktop-like usage (cheap server and "IoT" being the frequent use-case), but they also did not produce a lot of heat due to the modest CPU specs. Using the default case or leaving it barebones in somewhere protected was more than enough for extended operations.
Fast-forward to the Raspberry Pi 4, using the standard case can make it uncomfortably warm for long-term continous usage. Plastic isn't a good heat conductor, and I've dealt with this issue in the past by using an external USB fan "sandwiched" between the lid and the base (no joke!). There are also some fans that are powered by the GPIO pins. These active coolers, however, have the annoying bad side of noise that gets louder over time as the motor gets used up. Plus, they're mostly overkill: you don't need that much cooling unless you're compiling things or gaming frequently.
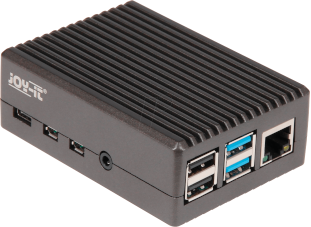
So what do we do? In comes passive cooling: essentially get yourself a case that is made of metal, designed to allow maximum irradiation of the heat the Pi generates. Here's an example cast in aluminum:

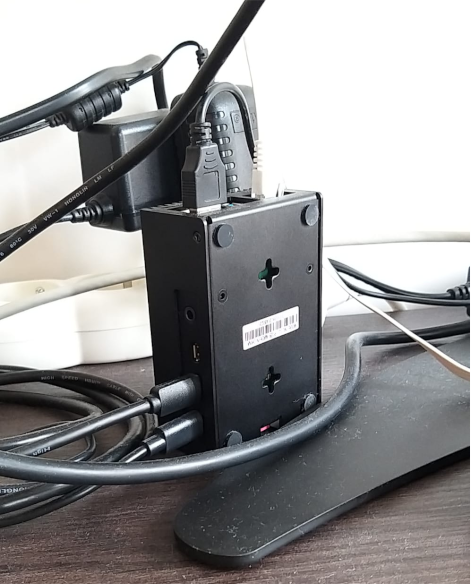
Furthermore, this sort of case gets more efficient depending on how you position it against the ventilation in the room. The geometry of it tells us that its greatest surface areas are at the bottom and the top, so we can increase the passive heat dissipation by leaving it in a vertical position, with the LEDs and SD card entry against the table:

With this setup, CPU temperatures of the Pi settled around a comfortable 45~53 degrees celsius, making it very usable even when high loads (videos, javascript, etc).
Set the color of your monitor to something warmer
The second big peeve of the Pi is that you cannot use something like redshift to dynamically change the temperature of the screen to warmer (i.e. redder) colors in the evening. This has something to do with the proprietary Broadcom video driver not being completely compatible with the the randr backend it uses, thus we're not able set the monitor colors or brightness from the software side. This is pretty annoying, especially as I've grown used to having redshift set that quite automatically in my laptops, and that bright blue light is pretty hard after a certain hour.
I've tried wearing orange-tinted glasses with it, or taking refuge in only the terminal (with warm fg colors) after the sun sets, all with mild success rates. Then I thought about something even easier: is there a way that I can set the intensity of the RGB colors in my monitor to taste? And voilà, problem solved.
Most monitors will have a stock "warm colorscheme" setting, but I found that these are often not warm enough to me (barely yellowing up the screen). Lucky for me, my monitor allows me to set the intensity of each one of the channels individually and save the preset, so I spent some time fine tuning it until it was like what I had in my laptop. Now every evening I just switch to night mode and can use my Pi into late night!
Set the CPUs back to 100% capacity
Ok, so here we are. the big point of the article. TL;DR is: you can put back your CPUs to 100% of its 1.6GHz capacity at all time, unlike the throttled down 600MHz that comes in stock. But first let's talk about some of my past failde attempts in this:
Early attempts and frustration
I was first hinted that this throttling issue when I tried the FreeBSD image for the Pi. True to their honor of extensive documentation, there was a tip scribbled below the install notes about making FreeBSD more usable on the Pi. The solution was as simple as enabling the powerd service by adding this line to /etc/rc.conf:
powerd="YES"
This apparently "normalizes" the power supply to the CPU to a "performance" level, and surely enough, after a reboot, the Pi with FreeBSD was a new machine: zero screen latency issues and a snappiness that resembled my laptop in pretty much every aspect!
I would have kept FreeBSD in there, since it's also an amazing OS, but there was one major caveat: lack of support for wifi and sound. Though I could've used a USB dongle for WiFi (not optimal, but hey), lack of sound was a large disappointment. And so this left me wondering about whether this could be doable in the Linux world, where these were not a problem. Thus began my search for a solution, which took much longer than I had ever thought.
If you blindly follow what's advised in the web when you search for how to use full clock cycle of the raspberry pi, you'll wind up editing the /boot/config.txt file, increasing the voltage, overclocking the CPU and rushing to buy a fan to cool off the poor little guy - not to mention the risk of damaging it in the long run. No thanks!
Every time I read a false positive article that preached overclocking, it was yet another day that I could not lift back the Pi to the full CPU capacity and the experience remained at an early-2000s speed of 600MHz per core. And a few days of it would be frustrating enough for me to yank it out of the monitor and go back to my laptop until I was curious enough to try again. And so this cycle remained - until I found a magic spell that changed everything.
cpupower changes everything
Come 2022, I remained Pi-less for a few weeks while I moved to a different place, having only my laptop to work with. After the furniture was in place, I became eager to pick up the little guy and give it a go again, even with the expectation that it'd be a temporary thing. I mean, it always was, right? This time, I looked elsewhere for an answer: the Fediverse. What were my options to achieve 100% CPU capacity - if any? Magically, @FreePjete showed me a promising lead: the cpupower command.
Long story short, the Linux kernel can change on-the-fly some aspects of how the CPU behaves during the run, and this includes the frequency at which it's running. The cpupower command is the knob that sets it. True to how get/set commands usually work, you can use to either find the current frequency your machine is running or set it to a new value - as long as it's within the hardware's limits.
In addition to the numerical value of the clock speed itself, there is also what's known as the "governor" of the CPU, which translates to the mode that your CPU is operating under, like "powersave" or "performance" in a typical laptop.
I was surprised to run cpupower for the first time in my Pi and discovered that it was configured by default to run into the powersave mode at 600MHz. Increasing the workload to "throttle" it back to full capacity did not work. Is there a way to manually crank it up to full capacity? And what is that full capacity anyway? Have a look at what cpupower gives me in my Pi:
$ cpupower frequency-info
analyzing CPU 0:
  driver: cpufreq-dt
  CPUs which run at the same hardware frequency: 0 1 2 3
  CPUs which need to have their frequency coordinated by software: 0 1 2 3
  maximum transition latency:  Cannot determine or is not supported.
  hardware limits: 600 MHz - 1.50 GHz
  available frequency steps:  600 MHz, 700 MHz, 800 MHz, 900 MHz, 1000 MHz, 1.10 GHz, 1.20 GHz, 1.30 GHz, 1.40 GHz, 1.50 GHz
  available cpufreq governors: performance schedutil
  current policy: frequency should be within 600 MHz and 1.50 GHz.
  The governor "performance" may decide which speed to use
  within this range.
  current CPU frequency: Unable to call hardware
  current CPU frequency: 600MHz (asserted by call to kernel)
Sweet! So we can clock it naturally all the way to 1.5GHz!
You can also query some special files under /sys to find out about these values - very much into the Unix principle. The files /sys/devices/system/cpu/cpu0/cpufreq/cpuinfo_max_freq and /sys/devices/system/cpu/cpu0/cpufreq/cpuinfo_min_freq, for example, indicate the hardware limits for the machine in terms of CPU cycles (values in kHz, by the way). And though I am not too quite sure of it, I have a hunch that you could even set the values by writing to either one of them.
Setting the frequency and the governor is done throught the following command:
cpupower frequency-set --max $FREQUENCY --governor performance
Where $FREQUENCE is a value in kHz, so for maximum performance you'd use 1500000.
I've also written a program in C to toggle the performance of the CPU between its maximum and defaults, which I added to my simple-utils repository. Sure, I could've also used a shell script to do it, but this would eliminate any possibility of studying.
And so now my Pi flies again... sort of.
Lessons learned
Combining these three elements (monitor, smarter cooling and full CPU) made my Pi change from a simple hobby or toy to a full-fledged workhorse in the house. I have been using it as my desktop seamlessly, and it feels so natural that sometimes I legitimately forget that it's "just" an SBC. But this feeling is strongest when I'm using efficient Linux applications, which are mostly command-line based.
The truth is: a Raspberry Pi at this stage will probably never be as fast as your laptop. And compared to a buffed up desktop setup? No way. There is simply not enough CPU / GPU power in a 50-dollar piece of hardware to compete with those...
... but does this really matter, in the end?
We can dream up and fantasize a world of small computing where everyone can have their own portable minicomputer at an accessible price to run highly-efficient software and access smol-web-like decentralized services. Reality is surely a whole lot more complicated: we often are forced to use heavy-ass, Javascrippled websites that have no respect to efficient software, and our dream world is actually only a very limited portion of the actual web.
You can by choice filter up the majority of these by choosing Free Frontends or alternatives that are lighter. But in the end, you eventually are required to face the bloat one way or another. And how did the Pi fare in the end?
Miraculously, it was usable, even if annoyingly slow at some times. And the most impressive part: RAM usage never went over 3.2 GB - even when I fully loaded Office365 and the MS Teams webapp into it as part of my usability experiment. This shows me that, for an all-around usage, 4GB of memory is probably OK most of the time; no need to whip out the 8GB model just for that. I mean, you consciously chose to use a Raspberry Pi; I bet that you can comfortably use efficient alternatives to clunky webapps.
My biggest peeve perhaps is video. In a small window, it's actually fine, but no matter how small the resolution, it insists to lag once I put it to full screen. Annoying, perhaps, but hey, it is indeed just a 50-dollar piece of hardware in the end, right?
The future
I see nothing that breaks my deal of keeping using my Pi as a desktop system here in my house, short of when the SD card fails due to I/O wear. Perhaps I'll try different distros to tune the experience (I'm using Debian 11), but if I made over 30 days, this means I can go basically forever.
A few things that I think could be fun to try are:
- Port-forwarding and mirroring this tilde.town site here. Or, who knows, have this be my definitive server for my site from now on.
- Put up an I2P router running 24/7.
- Hosting an XMPP instance. Maybe on I2P?
Oh yes, I2P. For the longest of times, it has been a goal to have a router running constantly, so I wouldn't have to do peer discovery every time I restarted my laptop. And now, thanks to this Pi, it looks like I finally can. The past weeks also had me rediscover this very quirky and cozy anonymous network built for file sharing, and I will probably write something about it. But for now I'm happy exploring it safely with an SBC!
Have you ever tried using a Raspberry Pi (any model) as your desktop computer? How was your experience? Let me know on Mastodon!
This post is number #33 of my #100DaysToOffload project. Follow my progress through Mastodon!
Last updated on 06/23/22